inventree-zebra-plugin
SergeoLacruz
last modified: 01 May 2024
Zebra Label Printer Plugin for Inventree
This is a label printing plugin for InvenTree, which provides support for Zebra Label printers. It was only tested with GK420T but should work for other ZPL printers too. It uses the ZPL library to convert the png data provided by InvenTree to Zebra’s bitmap format.
It can output the print data either to a local printer connected to the computer via USB or to a network printer with an IP address. The output can be configured in the InvenTree plugin user interface.
Error handling is very basic.
Installation
The plugin is on pypi. Install this plugin using pip with the following command:
pip install inventree-zebra-plugin
Configuration Options
Printer Interface
Here you can chose between Local printer or network printer. Default value is a local printer.
IP address
In case you use an IP printer set the IPv4 address here.
Port
In case you use an IP printer set the port number here. The default port number is 9100.
Local Device
In case of a local printer set the device here. The plugin actually puts the data directly to the device /dev/usb/lp0. No printer spooler is involved so far.
Threshold
The image from pillow comes in greyscale. The plugin converts it ti pure BW because this gives a much better print result. The threshold between black and white can be adjusted here.
Darkness
This is a value that influences the darkness of the print. Allowed values are 0 (white) to 30 (black). It is directly converted to a SD command in ZPL. If your black areas tend to blur out reduce the darkness.
Dots per mm
This sets the resolution of the printer. You can choose between 8, 12 and 24 dpmm depending on your printer model.
Printer init
This string added to the printer output. It can be used to set special commands e.g. label rotation, mirror or white on black. Please refer to the ZPL manual for more information.
Zebra printers store settings after printing. So if a rotated label has been printed all following label will be rotated unless you change it. The default sets the printer to settings that have been useful for me. You might want to change it according to your requirements. Please keep in mind that this string is passed directly to the printer without any checks. So be careful when editing here.
Label Template
The label needs a template described in html and css. The template should start with a page definition that defines the label size as shown below:
    @page {
        {% localize off %}
        height: {{ height }}mm;
        width: {{ width }}mm;
        {% endlocalize %}
        padding: 0mm;
        margin: 0px 0px 0px 0px;
        background-color: white;
    }
The height and width parameters are defined in the InvenTree admin panel in the label section. These values have to fit the label size that is in the printer. See the example templates for details on template definition.
Multi printer hack
We have the requirement to print labels in different sizes. As we do not want to change the reel for each print we set up a second printer loaded with a different label size. InvenTree is not yet able to handle different printers. So I added a multi printer hack. You can define a key with an IP address in the label meta data:
{"ip_address":"xxx.yyy.zzz.eee"}
{"darkness":xx}
If the printer driver finds that key, the IP address from the printer settings is overwritten with the address from the meta data. So the print will end up in another printer.
Only the IP address and darkness can be overwritten so far. All other settings remain.
How it works
First import all the stuff you need. Here we use the translation mechanism from Django for multi language support. The import the InvenTree libs and everything you need for plugin. Here we have ZPL for the Zebra bitmaps and socket for the IP connection to the printer.
The next part is this:
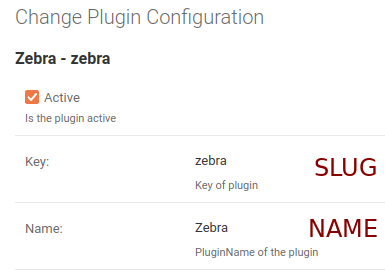
class ZebraLabelPlugin(LabelPrintingMixin, SettingsMixin, IntegrationPluginBase):

    AUTHOR = "Michael Buchmann"
    DESCRIPTION = "Label printing plugin for Zebra printers"
    VERSION = ZEBRA_PLUGIN_VERSION
    NAME = "Zebra"
    SLUG = "zebra"
    TITLE = "Zebra Label Printer"
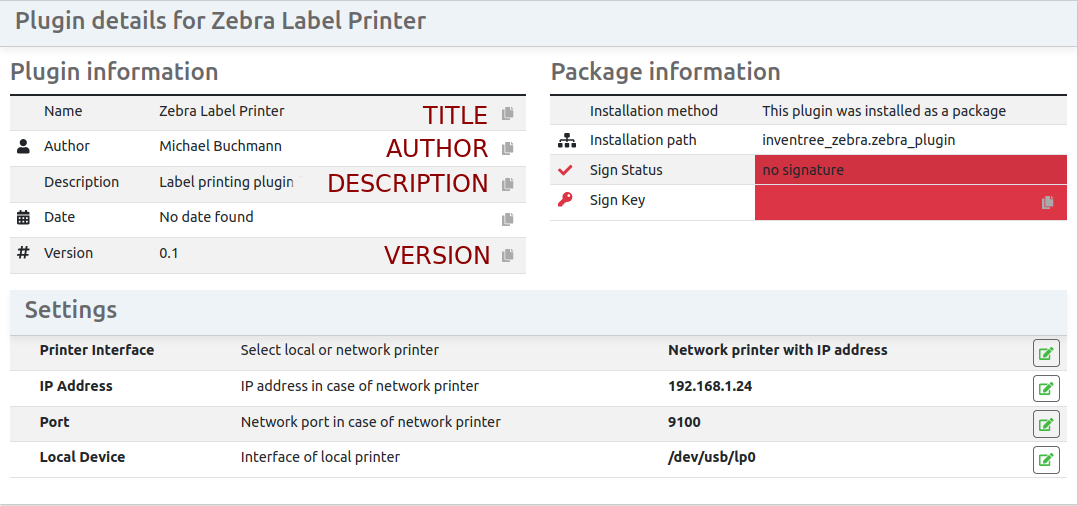
The name of the class can be freely chosen. You reference to it in the entry_points section of the setup.py file. The parameters need to be like in the example. Then there is the description block. The keywords are fixed and need to be like that. The values are found in the UI as shown in the pictures below.
Then we add the configuration parameters.
SETTINGS = {
        'CONNECTION': {
            'name': _('Printer Interface'),
            'description': _('Select local or network printer'),
            'choices': [('local','Local printer e.g. USB'),('network','Network printer with IP address')],
            'default': 'local',
        },
        'PORT': {
            'name': _('Port'),
            'description': _('Network port in case of network printer'),
            'default': '9100',
        },
    }
We need to define a dict with the name SETTINGS. Please be aware the keys need to be in all CAPITAL letters like CONNECTION. Simple parameters are just text strings like the port. We can set a default. The name and description shows up in the UI. Instead of a simple text we can also use choices. The first string like “local” it the key you use in the code. The second one is the description in the UI. After that we need to define a function:
def print_label(self, **kwargs){
The kwargs is a dict with the following keys:
- pdf_data
- user
- filename
- label_instance
- item_instance
- width
- height
- png_file
The item_instance is the part to be printed. This allows direct access to all part data. The arguments width and height come from the settings of the label in the admin interface. NOT from the html template. For the Zebra printer we use the png_file. This is a PIL (python Pillow) object with the graphic of the label in PNG format. The PIL object is a greyscale image. Because the printer can just print pure BW we convert this to a BW picture.
fn = lambda x : 255 if x > Threshold else 0
label_image = label_image.convert('L').point(fn, mode='1')
The threshold can by modified by a plugin parameter. 200 is a good starting value. This trick gives much better prints. We can put the result of this directly into the ZPL library.
l = zpl.Label(Height, Width, dpmm)
li.set_darkness(darkness)
...
l.write_graphic(label_image, Width)
l.endorigin()
Width and Height define is the size of the label in millimeters as described above. The third parameter is the resolution of the printer in dots per mm. write_graphic converts the pillow data to ZPL.
The plugin was tested with a labels of various sizes defined using css and html. The DPI scaling can be chosen in the InvenTree settings. 800 is a good value because it gives high quality.
The rest of the code is just output to the printer on different interfaces.
Quality matters
The InvenTree printer system uses a graphical representation of the label. The label is described in HTML, converted to a pixel graphic and printed. The advantage is independency from printer models and systems. Disadvantage is larger data and quality problems with darkness and scaling. Let’s have a look at the following printout:
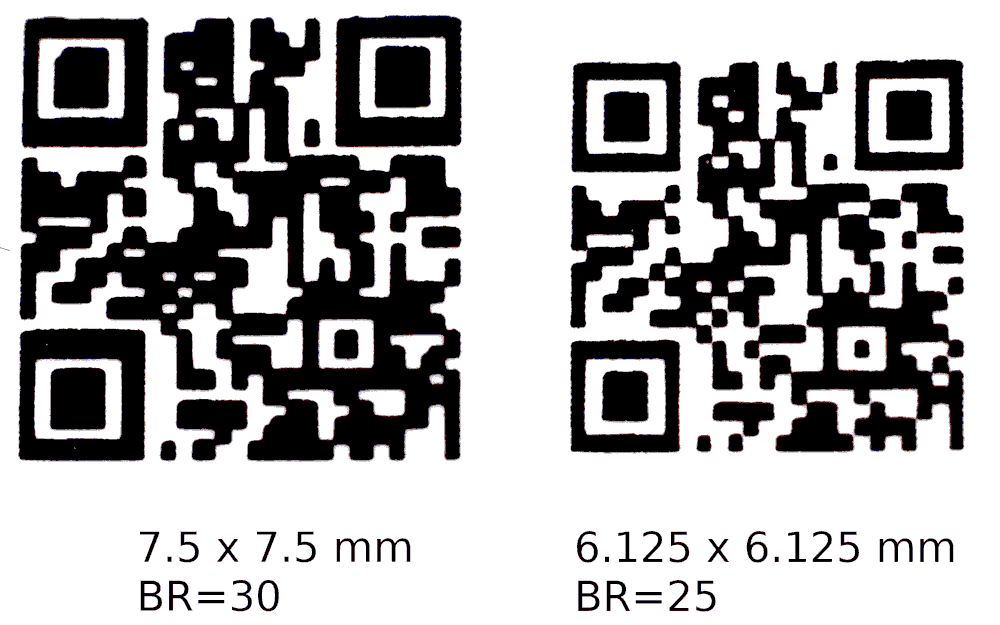
Both codes have been printed with the same printer on the same reel. The left one is hardly readable using my mobile. The right one reads easily even as it is smaller.
Secret 1, Scale
The printer resolution is 8 dots per mm resulting in a dot size of 0.125mm. The QR code pixel and the printer pixel size should be integrally divisible. The code in the picture has 21 pixels plus one in the frame, so 23 pixel. The frame is set in the HTML description.
{% qrcode qr_data border=1 %}
I selected two dots per pixel. So 23 * 2 * 0.125 = 6.125mm. If the size is something different scaling takes place and the result might be worse. If you like a larger printout select more dots per pixel. From a certain size upwards the value does not matter any more because the code gets large enough to be readable in any quality.
Secret 2: Darkness
Zebra printers allow to set the darkness of the print in values between 0 (white) and 30 (max) The left code was printed with a value 0r 30. The black dots tend to blur out a bit resulting in smaller white areas. The right code was printed with a value of 25 resulting in larger white pixels. The darkness values are just examples. Your values will differ based on printer model, media type and printer age. The printer head tends to wear out and the darkness value might need an adjustment from time to time.
Alternative
You can also bypass the InvenTree template and printing system and directly create ZPL from the parts data. The printer knows best how to render the label and the print quality is best. If you are interested in this way have a look at the inventree-zpl-plugin that does exactly that.
Detail section
License:
MIT
Issue Tracker
Sourcecode on GitHub
SergeoLacruz/inventree-zebra-plugin